h1

Pumpkin Chai Spice Doughnuts

October 27, 2010

The October 2010 Daring Bakers challenge was hosted by Lori of Butter Me Up. Lori chose to challenge DBers to make doughnuts. She used several sources for her recipes including Alton Brown, Nancy Silverton, Kate Neumann and Epicurious.

I have been thinking about trying to make my own doughnuts for a while now and pumpkin seemed very appropriate for the season so I went with the recipe from Epicurious. I wanted a bit more spice to my doughnuts so I doubled the spices in the original recipe and added some cardamom. I also am currently obsessed with Stash’s Chai Spice Tea so I added a bit of that as well.

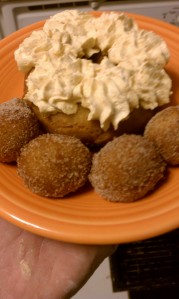
The doughnut holes got a ride in a bowl of cinnamon sugar and the doughnuts received kisses of pumpkin frosting. My co-baker Beth preferred the cinnamon sugar ones, but it was all about the pumpkin frosting for me. Enjoy!

Pumpkin Doughnuts:
Preparation time:
Hands on prep time – 15 minutes
Chilling time – 3 hours
Cooking time – 10 minutes
Yield: About 24 doughnuts & 24 doughnut holes

Ingredients
All Purpose Flour 3.5 cup

Baking Powder 4 teaspoon

Baking Soda ½ teaspoon

Table Salt 1 teaspoon

Cinnamon, ground 2 teaspoons

Ginger, ground 1 teaspoon

Nutmeg, ground 1/2  teaspoon

Cloves, ground 1/4 teaspoon

Cardamom, ground 1/8 teaspoon

White Granulated Sugar 1 cup

Butter, Unsalted 3 Tablespoon

Egg, Large 1

Egg Yolk, Large 2

Pure Vanilla Extract 1 teaspoon

Buttermilk ½ cup

2 bags Stash(r) Chai Spice tea steeped in 1 tablespoon of water

Pumpkin 1 cup

Canola Oil DEPENDS on size of vessel you are frying in

Directions:
1. Whisk together the first 8 ingredients in medium bowl to blend. Using electric mixer, beat sugar and butter in large bowl until blended (the mixture will be grainy and not smooth). Beat in egg, then yolks and vanilla. Gradually beat in buttermilk and tea; beat in pumpkin. Using rubber spatula, fold in dry ingredients in 4 additions, blending gently after each addition. Cover with plastic; chill 3 hours.
2. Sprinkle 2 rimmed baking sheets lightly with flour. Press out 1/3 of dough on floured surface to 1/2- to 2/3-inch (12 mm to 15 mm) thickness. Using 2 1/2-inch (65 mm) -diameter round cutter, cut out dough rounds. Arrange on sheets. Repeat with remaining dough in 2 more batches. Gather dough scraps. Press out dough and cut out more dough rounds until all dough is used.
3. Using 1-inch (25 mm) diameter round cutter, cut out center of each dough round to make doughnuts and doughnut holes.
4. Line 2 baking sheets with several layers of paper towels. Pour oil into large
deep skillet to depth of 1 1/2 inches (40 mm). Attach deep-fry thermometer
and heat oil to 365°F to 370°F. Fry doughnut holes in 2 batches until golden brown, turning occasionally, about 2 minutes. Using slotted spoon, transfer to paper towels to drain. Fry doughnuts, 3 or 4 at a time, until golden brown, adjusting heat to maintain temperature, about 1 minute per side. Using slotted spoon, transfer doughnuts to paper towels to drain. Cool completely.

Cinnamon Sugar

1 cup sugar

3 tablespoons cinnamon

Combine in a bowl. Use to coat doughnut holes. Is also tasty sprinkled on buttered toast 🙂

Pumpkin Frosting

1 8 oz pkg. cream cheese, softened

1 8 oz. pkg. Cool Whip, thawed

1 cup pumpkin

3/4 teaspoon pumpkin pie spice

1 cup powdered sugar

Cream cream cheese in mixer until smooth. Add pumpkin pie spice and powdered sugar and beat until incorporated. Gently fold in Cool-Whip. Pipe onto doughnuts. Refrigerate any unused amount.

h1

Piece Montée or Croquembouche – May DBC

May 27, 2010

The May 2010 Daring Bakers’ challenge was hosted by Cat of Little Miss Cupcake. Cat challenged everyone to make a piece montée, or croquembouche, based on recipes from Peter Kump’s Baking School in Manhattan and Nick Malgieri.

Original Challenge recipe below!

Preparation time: You will want to use your puff pastry batter and chocolate glaze or caramel as soon as it has been prepared and as close to serving time as possible. This is not a dessert that stores well and it may be a bit temperamental in humid areas as the glaze needs to harden to hold the choux together. The crème patissiere can be made a couple of days in advance and stored in the fridge until ready to use.

You will need approximately 10 minutes to prepare the puff pastry, 10 minutes to pipe and about 30 minutes to bake each batch. The crème patissiere should take about 10 minutes to cook and then will need to be cooled for at least 6 hours or overnight. The glazes take about 10 minutes to prepare.

Equipment required:
• several baking sheets
• parchment paper
• a whisk
• a pastry brush (for the egg wash)
• a pastry bag and tip (a plain tip or no tip is best for piping the puff pastry; you can use a plain or star tip to fill the puff pastry with the cream)
• a flat surface such as a baking sheet or cake board/stand on which to assemble your piece montée
• some of the items you may want to use to decorate your piece montée include ribbons, Jordan almonds, fresh flowers, sugar cookie cut-outs, chocolates, etc.

Ingredients:

For the Vanilla Crème Patissiere (Half Batch)
1 cup (225 ml.) whole milk
2 Tbsp. cornstarch
6 Tbsp. (100 g.) sugar
1 large egg
2 large egg yolks
2 Tbsp. (130 g.) unsalted butter
1 Tsp. Vanilla

Dissolve cornstarch in ¼ cup of milk. Combine the remaining milk with the sugar in a saucepan; bring to boil; remove from heat.

Beat the whole egg, then the yolks into the cornstarch mixture. Pour 1/3 of boiling milk into the egg mixture, whisking constantly so that the eggs do not begin to cook.

Return the remaining milk to boil. Pour in the hot egg mixture in a stream, continuing whisking.

Continue whisking (this is important – you do not want the eggs to solidify/cook) until the cream thickens and comes to a boil. Remove from heat and beat in the butter and vanilla.

Pour cream into a stainless steel/ceramic bowl. Press plastic wrap firmly against the surface. Chill immediately and until ready to use.

For Chocolate Pastry Cream (Half Batch Recipe):
Bring ¼ cup (about 50 cl.) milk to a boil in a small pan; remove from heat and add in 3 ounces (about 80 g.) semisweet chocolate, finely chopped, and mix until smooth. Whisk into pastry cream when you add the butter and vanilla.

For Coffee Pastry Cream (Half Batch recipe)
Dissolve 1 ½ teaspoons instant espresso powder in 1 ½ teaspoons boiling water. Whisk into pastry cream with butter and vanilla.

Pate a Choux (Yield: About 28)
¾ cup (175 ml.) water
6 Tbsp. (85 g.) unsalted butter
¼ Tsp. salt
1 Tbsp. sugar
1 cup (125 g.) all-purpose flour
4 large eggs

For Egg Wash: 1 egg and pinch of salt

Pre-heat oven to 425◦F/220◦C degrees. Line two baking sheets with parchment paper.

Preparing batter:
Combine water, butter, salt and sugar in a saucepan over medium heat. Bring to a boil and stir occasionally. At boil, remove from heat and sift in the flour, stirring to combine completely.

Return to heat and cook, stirring constantly until the batter dries slightly and begins to pull away from the sides of the pan.

Transfer to a bowl and stir with a wooden spoon 1 minute to cool slightly.

Add 1 egg. The batter will appear loose and shiny.

As you stir, the batter will become dry-looking like lightly buttered mashed potatoes.

It is at this point that you will add in the next egg. Repeat until you have incorporated all the eggs.

Piping:
Transfer batter to a pastry bag fitted with a large open tip (I piped directly from the bag opening without a tip). Pipe choux about 1 inch-part in the baking sheets. Choux should be about 1 inch high about 1 inch wide.

Using a clean finger dipped in hot water, gently press down on any tips that have formed on the top of choux when piping. You want them to retain their ball shape, but be smoothly curved on top.

Brush tops with egg wash (1 egg lightly beaten with pinch of salt).

Baking:
Bake the choux at 425◦F/220◦C degrees until well-puffed and turning lightly golden in color, about 10 minutes.

Lower the temperature to 350◦F/180◦C degrees and continue baking until well-colored and dry, about 20 minutes more. Remove to a rack and cool.

Can be stored in a airtight box overnight.

Filling:
When you are ready to assemble your piece montée, using a plain pastry tip, pierce the bottom of each choux. Fill the choux with pastry cream using either the same tip or a star tip, and place on a paper-lined sheet. Choux can be refrigerated briefly at this point while you make your glaze.

Use one of these to top your choux and assemble your piece montée.

Chocolate Glaze:
8 ounces/200 g. finely chopped chocolate (use the finest quality you can afford as the taste will be quite pronounced; I recommend semi-sweet)

Melt chocolate in microwave or double boiler. Stir at regular intervals to avoid burning. Use the best quality chocolate you can afford. Use immediately.

Hard Caramel Glaze:
1 cup (225 g.) sugar
½ teaspoon lemon juice

Combine sugar and lemon juice in a saucepan with a metal kitchen spoon stirring until the sugar resembles wet sand. Place on medium heat; heat without stirring until sugar starts to melt around the sides of the pan and the center begins to smoke. Begin to stir sugar. Continue heating, stirring occasionally until the sugar is a clear, amber color. Remove from heat immediately; place bottom of pan in ice water to stop the cooking. Use immediately.

Assembly of your Piece Montée:
You may want to lay out your unfilled, unglazed choux in a practice design to get a feel for how to assemble the final dessert. For example, if making a conical shape, trace a circle (no bigger than 8 inches) on a piece of parchment to use as a pattern. Then take some of the larger choux and assemble them in the circle for the bottom layer. Practice seeing which pieces fit together best.

Once you are ready to assemble your piece montée, dip the top of each choux in your glaze (careful it may be still hot!), and start assembling on your cake board/plate/sheet. Continue dipping and adding choux in levels using the glaze to hold them together as you build up. (You may want to use toothpicks to hold them in place – see video #4 below).

When you have finished the design of your piece montée, you may drizzle with remaining glaze or use ribbons, sugar cookie cut-outs, almonds, flowers, etc. to decorate. Have fun and enjoy! Bon appétit!

h1

Traditional British Suet Pudding – April DBC

April 27, 2010

The April 2010 Daring Bakers’ challenge was hosted by Esther of The Lilac Kitchen. She challenged everyone to make a traditional British pudding using, if possible, a very traditional British ingredient: suet.

I was very intrigued when this came up as the DBC for this month. I’ve never baked with suet nor ever really considered it before now. In my experience, the only time I’ve seen suet is in bird feed squares!  I never knew, until recently, that people even cooked with it.

I recently purchased, second-hand, a book called Pie Every Day and in the author’s discussion of pie crusts she mentions suet! Apparently, suet used to be a very common ingredient in pie crusts in the past. Who knew? Certainly not I. Now, in the discussion in the book she states that suet gives it’s pies a meaty flavor that is hard to overcome with sweet ingredients and makes for a very hard crust. With these two bits of information it was easy for me to decide to go the savory route rather than make something sweet with suet.

The next decision was WHAT savory to make. The sample we were given (listed below) was for steak and kidney pudding. Steak? Yes, please! Kidney? Umm, I’m really not that hungry… So I wanted to find an alternative. Now, being the lovely Daring Baker Challenge host that Esther is, she gave us several links to help us along our puddin’ makin’ way. After perusing her links and pondering a bit I came up with a Meat and Potato Pudding! Esther decided to be kind to us and let us make some non-suet recipes as well so I also made a Very Chocolate Pudding.

My hardest challenge for this… er, challenge was to find the right kind of bowl! I ended up going to 5 different stores before I finally found one at Dillard’s. Apparently, tall and narrow is not very common in America. We seem to be the short and fat bowl kind of people. Ya know… that may just be a commentary on society there…

I found my recipes here and here.

Original challenge recipe below!

Preparation time: Preparation time is 5 to 20 minutes depending on the filling. Cooking time is 1 to 5 hours so do this on a day you have jobs around the house to do or are popping in and out as you need to occasionally check the pan hasn’t boiled dry! However it is otherwise a very low time requirement dish.

Equipment required:
• 2 pint (1 litre) pudding bowl or steam-able containers to contain a similar amount they should be higher rather than wide and low
• Steamer or large pan, ideally with a steaming stand, upturned plate or crumpled up piece of kitchen foil
• Mixing bowl
• Spoon
• Measuring cups or scales
• Foil or grease proof paper to cover the bowl
• String

Type 1 Puddings — suet crusts.

Pudding Crust for both Savoury Pudding or Sweet Pudding (using suet or a suet substitute):

Ingredients

(250 grams/12 ounces) Self-raising flour (Note* If you cannot find self-raising flour, use a combination of all-purpose flour and baking powder.)
(175 grams/6 ounces) Shredded suet or suet substitute (i.e., Vegetable Suet, Crisco, Lard)
(a pinch) Salt and pepper (Note* If making a savory dish, can be replaced with spices for sweet if wished.)
(210 millilitres/a little less than a cup) Water (Note* You can use a milk or a water and milk mix for a richer pastry.)

1. Mix the flour and suet together.
2. Season the flour and suet mixture with salt and pepper if savory and just a bit of salt and/or spices if sweet.
3. Add the water, a tablespoonful at a time, as you mix the ingredients together. Make up the pastry to firm an elastic dough that leaves the bowl clean. The liquid amounts are only an estimate and most recipes just say water to mix.
4. Don’t over handle the pastry or it will be too hard.
5. Reserve a quarter for the lid and roll out the rest and line a well-greased bowl.
6. At this point add your filling.. a couple of options are give below but have fun and go wild!
7. Roll the final piece of pastry out into a circle big enough to cover the top of the basin, dampen the edges and put in position on the pudding, pinching the edges together to seal.
8. Seal well and cover with a double sheet of foil – pleated in the centre to allow room for expansion while cooking. Secure with string, and place it in a steamer over boiling water.
9. Steam for up to 5 hours, you may need to add more boiling water halfway through or possibly more often. There is a lot of leeway in this steaming time and different recipes give different steaming times. Delia Smith says 5 hours for Steak and kidney where as Mrs Beeton says 2.5 for a similar dish! One way to tell that it is cooked is when the pastry changes colour and goes from white to a sort of light golden brown. It is also hard to over steam a pudding so you can leave it bubbling away until you are ready.

This sort of pastry can also be used as a topping for a baked meat pie and becomes quite a light crusty pastry when baked.

Savoury Pudding Filling options: steak and kidney pudding.

1 full amount of suet crust (see recipe above)
(450 grams/about 1 pound) Chuck steak
(225 grams/about 1/2 a pound) Ox kidney
1 medium-sized onion
2 teaspoons well-seasoned flour
splash of Worcestershire sauce

1. Chop the steak and kidney into fairly small cubes, toss them in seasoned flour, then add them to the pastry lined basin.
2. Pop the onion slices in here and there.
3. Add enough cold water to reach almost to the top of the meat and sprinkle in a few drops of Worcestershire sauce and season with salt and pepper.
4. Follow the rest of the instructions in the crust recipe to finish pudding.
5. Cook for at least 2.5 hours (Mrs Beeton) up to 5 hours (Delia Smith).

Sweet Pudding Options: Sussex Pond Pudding

1 amount of suet pastry (see recipe above)
(120 grams/4.2 ounces) Demerara Sugar
(120 grams/4.2 ounces) unsalted butter
1 large lemon

1. Cut the butter into small pieces and put half in the basin with half the sugar.
2. Prick the whole lemon (preferably one with a thin skin) all over, using a thick skewer.
3. Place on top of the butter and sugar in the basin.
4. Cover with the rest of the butter and sugar.
5. Finish building the pudding as per the pastry recipe.
6. Steam for 3 ½ hours, or longer (for a really tender lemon), adding more water if needed.
7. To serve, turn the pudding into a dish with a deep rim, when you slice into it the rich lemon sauce will gush out.
8. Make sure each person is served some of the suet crust, lemon and tangy luscious sauce.

Type 2 puddings – Steamed Suet Pudding, sponge type.

(100 grams/4 ounces) All-purpose flour
(1/4 teaspoon) salt
(1.5 teaspoons) Baking powder
(100 grams/4 ounces) breadcrumbs
(75 grams/3 ounces) Caster sugar
(75 grams/ 3 ounces) Shredded suet or suet substitute (i.e., Vegetable Suet, Crisco, Lard)
(1) large egg
(6 to 8 tablespoons) Cold milk

1. Sift flour, salt and baking powder into bowl.
2. Add breadcrumbs, sugar and suet.
3. Mix to a soft batter with beaten egg and milk
4. Turn into a buttered 1 litre/ 2pint pudding basin and cover securely with buttered greaseproof paper or aluminum foil.
5. Steam steadily for 2.5 to 3 hours
6. Turn out onto warm plate, Serve with sweet sauce to taste such as custard, caramel or a sweetened fruit sauce.

Variants:
Spotted Dick – Add 75g/ 3oz currants and 25g/1 oz of mixed chopped peel with the sugar.
Syrup or Treacle or Marmalade Pudding – put 2 Tablespoons of golden syrup, treacle or marmalade at the bottom of the bowl before adding pudding mix.
My Fair Lady Pudding – Add finely grated rind of 1 medium orange or lemon with the sugar.
Ginger Pudding – replace the sugar with 100g/4oz of treacle, and add 1/2 tsp ground ginger.

h1

Orange Tian, er…, I mean Lemon Lime! – March DBC

March 27, 2010

The 2010 March Daring Baker’s challenge was hosted by Jennifer of Chocolate Shavings. She chose Orange Tian as the challenge for this month, a dessert based on a recipe from Alain Ducasse’s Cooking School in Paris.

Prior to this challenge I had never even heard of “tian”. Prior to reading the challenge post I didn’t have the slightest idea what I needed to do or to make. Once I got through perusing the post, however, I was intrigued. I’ve never made my own marmalade and was excited to give it a try.

Now I am not a huge fan of orange in desserts. Orange with savory? Sure! Orange juice? Sure! Orange by itself? Sure! Orange with pastry? Um, no thanks. So I opted to go with flavors that tempt me more. I love lemon and I love lime. Particularly key lime, but alas they are out of season.

Thus my lemon-lime tian was conceived. I made both a lemon and a lime marmalade and alternated the fruit segments in the pan to make a pretty pattern on the plate. Wow. That’s a lot of p’s. Illiteration, folks! We’re serving it here!

We were given the option of making individual servings or one large tian. Had I been making a single flavor I might have gone with the individual servings, but I didn’t think I’d be able to make it as pretty as I wanted on such a small scale. Thus, I made one large tian so I could play with the segment arrangement.

I waffled back and forth as to whether I wanted to make two different batches of whipped cream and put the individual marmalades into their own batches or make on combo batch. In the end, I decided to make a lemon-lime whipped cream. Just for the sake of ease in assembly. While I know I could have segmented the cream above their respected flavors I did not have that kind of time the day I was assembling this after arranging the citrus segments.

Note: having some camera issues. Pic’s will follow as soon as I can get it worked out!

Update: Alas, no photos 😦 Memory card has died. If I make it again I’ll be sure to add them.

It came out very prettily and tasted divine! I highly recommend this to everyone!  Try making your own! The original recipe is below:

Preparation time:
– Pate Sablee: 20 minutes to make, 30 minutes to rest, 15 minutes to roll out, 20 minutes to bake
– Marmalade: 20 minutes to make, 30 minutes to blanch
– Orange segments: 20 minutes, overnight to sit
– Caramel: 15 minutes, overnight to sit
– Whipped Cream: 15 minutes
– Assembling: 20 minutes
– Freezer to Set: 10 minutes

Equipment required:
• Cookie cutters . Ideally, you should have about 6 cookie cutters to build the desserts in and cut the circles of dough (see photo). The cookie cutters will be the size of your final dessert, so they should be the size of an individually-sized tart mold. If you don’t have round cookie cutters you could use an individually-sized cheesecake mold without its base.
• A food processor (although the dough could be made by hand too)
• A stand-up or hand mixer
• Parchment paper or a silicone sheet
• A baking sheet
• A rolling pin

For the Pate Sablee:

Ingredients U.S. Imperial Metric Instructions for Ingredients
2 medium-sized egg yolks at room temperature
granulated sugar 6 tablespoons + 1 teaspoon; 2.8 oz; 80 grams
vanilla extract ½ teaspoon
Unsalted butter ¼ cup + 3 tablespoons; 3.5 oz; 100 grams ice cold, cubed
Salt 1/3 teaspoon; 2 grams
All-purpose flour 1.5 cup + 2 tablespoons; 7 oz; 200 grams
baking powder 1 teaspoon ; 4 grams

Directions:
Put the flour, baking powder, ice cold cubed butter and salt in a food processor fitted with a steel blade.

In a separate bowl, add the eggs yolks, vanilla extract and sugar and beat with a whisk until the mixture is pale. Pour the egg mixture in the food processor.

Process until the dough just comes together. If you find that the dough is still a little too crumbly to come together, add a couple drops of water and process again to form a homogeneous ball of dough. Form into a disc, cover with plastic wrap and leave to rest in the fridge for 30 minutes.
Preheat your oven to 350 degree Celsius.

Roll out the dough onto a lightly floured surface until you obtain a ¼ inch thick circle.

Using your cookie cutter, cut out circles of dough and place on a parchment (or silicone) lined baking sheet. Bake for 20 minutes or until the circles of dough are just golden.

For the Marmalade:

Ingredients U.S. Imperial Metric Instructions for Ingredients
Freshly pressed orange juice ¼ cup + 3 tablespoons; 3.5 oz; 100 grams
1 large orange used to make orange slices
cold water to cook the orange slices
pectin 5 grams
granulated sugar: use the same weight as the weight of orange slices once they are cooked

Finely slice the orange. Place the orange slices in a medium-sized pot filled with cold water. Simmer for about 10 minutes, discard the water, re-fill with cold water and blanch the oranges for another 10 minutes.

Blanch the orange slices 3 times. This process removes the bitterness from the orange peel, so it is essential to use a new batch of cold water every time when you blanch the slices.

Once blanched 3 times, drain the slices and let them cool.

Once they are cool enough to handle, finely mince them (using a knife or a food processor).

Weigh the slices and use the same amount of granulated sugar . If you don’t have a scale, you can place the slices in a cup measure and use the same amount of sugar.

In a pot over medium heat, add the minced orange slices, the sugar you just weighed, the orange juice and the pectin. Cook until the mixture reaches a jam consistency (10-15 minutes).

Transfer to a bowl, cover with plastic wrap and put in the fridge.

For the Orange Segments:

For this step you will need 8 oranges.

Cut the oranges into segments over a shallow bowl and make sure to keep the juice. Add the segments to the bowl with the juice.

For the Caramel:

Ingredients U.S. Metric Imperial Instructions for Ingredients
granulated sugar 1 cup; 7 oz; 200 grams
orange juice 1.5 cups + 2 tablespoons; 14 oz; 400 grams

Place the sugar in a pan on medium heat and begin heating it.

Once the sugar starts to bubble and foam, slowly add the orange juice. As soon as the mixture starts boiling, remove from the heat and pour half of the mixture over the orange segments.

Reserve the other half of the caramel mixture in a small bowl — you will use this later to spoon over the finished dessert. When the dessert is assembled and setting in the freezer, heat the kept caramel sauce in a small saucepan over low heat until it thickens and just coats the back of a spoon (about 10 minutes). You can then spoon it over the orange tians.

[Tip: Be very careful when making the caramel — if you have never made caramel before, I would suggest making this step while you don’t have to worry about anything else. Bubbling sugar is extremely, extremely hot, so make sure you have a bowl of ice cold water in the kitchen in case anyone gets burnt!]

For the Whipped Cream:

Ingredients U.S. Metric Imperial Instructions for Ingredients
heavy whipping cream 1 cup; 7 oz; 200 grams
3 tablespoons of hot water
1 tsp Gelatin
1 tablespoon of confectioner’s sugar
orange marmalade (see recipe above) 1 tablespoon

In a small bowl, add the gelatin and hot water, stirring well until the gelatin dissolves. Let the gelatin cool to room temperature while you make the whipped cream. Combine the cream in a chilled mixing bowl. Whip the cream using a hand mixer on low speed until the cream starts to thicken for about one minute. Add the confectioner sugar. Increase the speed to medium-high. Whip the cream until the beaters leave visible (but not lasting) trails in the cream, then add the cooled gelatin slowly while beating continuously. Continue whipping until the cream is light and fluffy and forms soft peaks. Transfer the whipped cream to a bowl and fold in the orange marmalade.
[Tip: Use an ice cold bowl to make the whipped cream in. You can do this by putting your mixing bowl, cream and beater in the fridge for 20 minutes prior to whipping the cream.]

Assembling the Dessert:

Make sure you have some room in your freezer. Ideally, you should be able to fit a small baking sheet or tray of desserts to set in the freezer.

Line a small tray or baking sheet with parchment paper or a silicone sheet. Lay out 6 cookie cutters onto the parchment paper/silicone.

Drain the orange segments on a kitchen towel.

Have the marmalade, whipped cream and baked circles of dough ready to use.

Arrange the orange segments at the bottom of each cookie cutter. Make sure the segments all touch either and that there are no gaps. Make sure they fit snuggly and look pretty as they will end up being the top of the dessert. Arrange them as you would sliced apples when making an apple tart.

Once you have neatly arranged one layer of orange segments at the bottom of each cookie cutter, add a couple spoonfuls of whipped cream and gently spread it so that it fills the cookie cutter in an even layer. Leave about 1/4 inch at the top so there is room for dough circle.

Using a butter knife or small spoon, spread a small even layer of orange marmalade on each circle of dough.

Carefully place a circle of dough over each ring (the side of dough covered in marmalade should be the side touching the whipping cream). Gently press on the circle of dough to make sure the dessert is compact.

Place the desserts to set in the freezer to set for 10 minutes.

Using a small knife, gently go around the edges of the cookie cutter to make sure the dessert will be easy to unmold. Gently place your serving plate on top of a dessert (on top of the circle of dough) and turn the plate over. Gently remove the cookie cutter, add a spoonful of caramel sauce and serve immediately.

h1

February Daring Bakers’ Challenge – Tiramisu

February 27, 2010

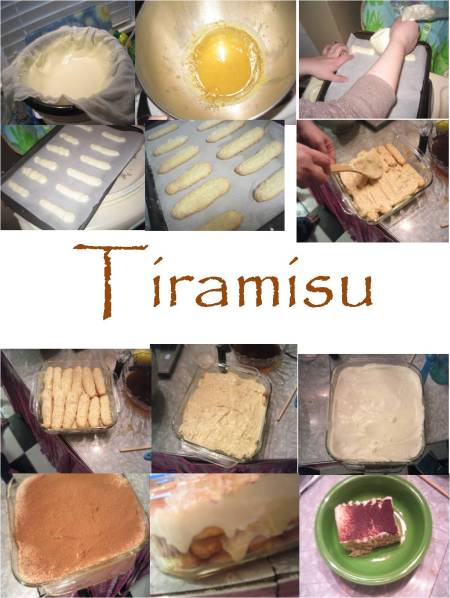
The February 2010 Daring Bakers’ challenge was hosted by Aparna of My Diverse Kitchen and Deeba of Passionate About Baking. They chose Tiramisu as the challenge for the month. Their challenge recipe is based on recipes from The Washington Post, Cordon Bleu at Home and Baking Obsession.

I have had Tiramisu a few times before and never really thought it lived up to the hype so I wasn’t super excited when I saw it was February’s challenge. But I figured, what the heck, maybe I’ll like it better this time. Boy howdy! Did I ever! As has been proven to me many, many times before, homemade is infinitely better than anything store bought or ordered at a restaurant where desserts are concerned. I could easily have eaten the entire pan. Luckily I had my hubby and some friends over to help eat it. This is definitely going in the “make again” file!

Super yummy!

TIRAMISU

(Recipe source: Carminantonio’s Tiramisu from The Washington Post, July 11 2007 )
This recipe makes 6 servings

Ingredients:
For the zabaglione:
2 large egg yolks
3 tablespoons sugar/50gms
1/4 cup/60ml Marsala wine (or port or coffee) (Note: I used and English toffee flavored coffee)
1/4 teaspoon/ 1.25ml vanilla extract
1/2 teaspoon finely grated lemon zest

For the vanilla pastry cream:
1/4 cup/55gms sugar
1 tablespoon/8gms all purpose flour
1/2 teaspoon finely grated lemon zest
1/2 teaspoon/ 2.5ml vanilla extract
1 large egg yolk
3/4 cup/175ml whole milk

For the whipped cream:
1 cup/235ml chilled heavy cream (we used 25%)
1/4 cup/55gms sugar
1/2 teaspoon/ 2.5ml vanilla extract

To assemble the tiramisu:
2 cups/470ml brewed espresso, warmed (Note: I used and English toffee flavored coffee)
1 teaspoon/5ml rum extract (optional)
1/2 cup/110gms sugar
1/3 cup/75gms mascarpone cheese
36 savoiardi/ ladyfinger biscuits (you may use less)
2 tablespoons/30gms unsweetened cocoa powder

Method:
For the zabaglione:
Heat water in a double boiler. If you don’t have a double boiler, place a pot with about an inch of water in it on the stove. Place a heat-proof bowl in the pot making sure the bottom does not touch the water.
In a large mixing bowl (or stainless steel mixing bowl), mix together the egg yolks, sugar, the Marsala (or espresso/ coffee), vanilla extract and lemon zest. Whisk together until the yolks are fully blended and the mixture looks smooth.
Transfer the mixture to the top of a double boiler or place your bowl over the pan/ pot with simmering water. Cook the egg mixture over low heat, stirring constantly, for about 8 minutes or until it resembles thick custard. It may bubble a bit as it reaches that consistency.
Let cool to room temperature and transfer the zabaglione to a bowl. Cover and refrigerate at least 4 hours or overnight, until thoroughly chilled.

For the pastry cream:
Mix together the sugar, flour, lemon zest and vanilla extract in a medium heavy-bottomed saucepan. To this add the egg yolk and half the milk. Whisk until smooth.
Now place the saucepan over low heat and cook, stirring constantly to prevent the mixture from curdling.
Add the remaining milk a little at a time, still stirring constantly. After about 12 minutes the mixture will be thick, free of lumps and beginning to bubble. (If you have a few lumps, don’t worry. You can push the cream through a fine-mesh strainer.)
Transfer the pastry cream to a bowl and cool to room temperature. Cover with plastic film and refrigerate at least 4 hours or overnight, until thoroughly chilled.

For the whipped cream:
Combine the cream, sugar and vanilla extract in a mixing bowl. Beat with an electric hand mixer or immersion blender until the mixture holds stiff peaks. Set aside.

To assemble the tiramisu:
Have ready a rectangular serving dish (about 8″ by 8″ should do) or one of your choice.
Mix together the warm espresso, rum extract and sugar in a shallow dish, whisking to mix well. Set aside to cool.
In a large bowl, beat the mascarpone cheese with a spoon to break down the lumps and make it smooth. This will make it easier to fold. Add the prepared and chilled zabaglione and pastry cream, blending until just combined. Gently fold in the whipped cream. Set this cream mixture aside.

Now to start assembling the tiramisu.
Workings quickly, dip 12 of the ladyfingers in the sweetened espresso, about 1 second per side. They should be moist but not soggy. Immediately transfer each ladyfinger to the platter, placing them side by side in a single row. You may break a lady finger into two, if necessary, to ensure the base of your dish is completely covered.
Spoon one-third of the cream mixture on top of the ladyfingers, then use a rubber spatula or spreading knife to cover the top evenly, all the way to the edges.
Repeat to create 2 more layers, using 12 ladyfingers and the cream mixture for each layer. Clean any spilled cream mixture; cover carefully with plastic wrap and refrigerate the tiramisu overnight.
To serve, carefully remove the plastic wrap and sprinkle the tiramisu with cocoa powder using a fine-mesh strainer or decorate as you please. Cut into individual portions and serve.

MASCARPONE CHEESE

(Source: Vera’s Recipe for Homemade Mascarpone Cheese)
This recipe makes 12oz/ 340gm of mascarpone cheese

Ingredients:
500 ml whipping (36 %) pasteurized (not ultra-pasteurized), preferably organic cream
1 tablespoon fresh lemon juice

Method:

Bring 1 inch of water to a boil in a wide skillet. Reduce the heat to medium-low so the water is barely simmering. Pour the cream into a medium heat-resistant bowl, then place the bowl into the skillet. Heat the cream, stirring often, to 190 F. If you do not have a thermometer, wait until small bubbles keep trying to push up to the surface.
It will take about 15 minutes of delicate heating. Add the lemon juice and continue heating the mixture, stirring gently, until the cream curdles. Do not expect the same action as you see during ricotta cheese making. All that the whipping cream will do is become thicker, like a well-done crème anglaise. It will cover a back of your wooden spoon thickly. You will see just a few clear whey streaks when you stir. Remove the bowl from the water and let cool for about 20 minutes. Meanwhile, line a sieve with four layers of dampened cheesecloth and set it over a bowl. Transfer the mixture into the lined sieve. Do not squeeze the cheese in the cheesecloth or press on its surface (be patient, it will firm up after refrigeration time). Once cooled completely, cover with plastic wrap and refrigerate (in the sieve) overnight or up to 24 hours.
Vera’s notes: The first time I made mascarpone I had all doubts if it’d been cooked enough, because of its custard-like texture. Have no fear, it will firm up beautifully in the fridge, and will yet remain lusciously creamy.
Keep refrigerated and use within 3 to 4 days.

LADYFINGERS/ SAVOIARDI BISCUITS
(Source: Recipe from Cordon Bleu At Home)
This recipe makes approximately 24 big ladyfingers or 45 small (2 1/2″ to 3″ long) ladyfingers.

Ingredients:
3 eggs, separated
6 tablespoons /75gms granulated sugar
3/4 cup/95gms cake flour, sifted (or 3/4 cup all purpose flour + 2 tbsp corn starch)
6 tablespoons /50gms confectioner’s sugar,

Method:

Preheat your oven to 350 F (175 C) degrees, then lightly brush 2 baking sheets with oil or softened butter and line with parchment paper.
Beat the egg whites using a hand held electric mixer until stiff peaks form. Gradually add granulate sugar and continue beating until the egg whites become stiff again, glossy and smooth.
In a small bowl, beat the egg yolks lightly with a fork and fold them into the meringue, using a wooden spoon. Sift the flour over this mixture and fold gently until just mixed. It is important to fold very gently and not overdo the folding. Otherwise the batter would deflate and lose volume resulting in ladyfingers which are flat and not spongy.
Fit a pastry bag with a plain tip (or just snip the end off; you could also use a Ziploc bag) and fill with the batter. Pipe the batter into 5″ long and 3/4″ wide strips leaving about 1″ space in between the strips.
Sprinkle half the confectioner’s sugar over the ladyfingers and wait for 5 minutes. The sugar will pearl or look wet and glisten. Now sprinkle the remaining sugar. This helps to give the ladyfingers their characteristic crispness.
Hold the parchment paper in place with your thumb and lift one side of the baking sheet and gently tap it on the work surface to remove excess sprinkled sugar.
Bake the ladyfingers for 10 minutes, then rotate the sheets and bake for another 5 minutes or so until the puff up, turn lightly golden brown and are still soft.
Allow them to cool slightly on the sheets for about 5 minutes and then remove the ladyfingers from the baking sheet with a metal spatula while still hot, and cool on a rack.
Store them in an airtight container till required. They should keep for 2 to 3 weeks.

h1

January Daring Baker’s Challenge – Nanaimo Bars

January 27, 2010

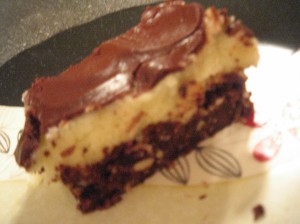
The January 2010 Daring Bakers’ challenge was hosted by Lauren of Celiac Teen. Lauren chose Gluten-Free Graham Wafers and Nanaimo Bars as the challenge for the month. The sources she based her recipe on are 101 Cookbooks and www.nanaimo.ca.

For Gluten-Free Graham Wafers
Ingredients
1 cup (138 g) (4.9 ounces) Sweet rice flour (also known as glutinous rice flour)
3/4 cup (100 g) (3.5 ounces) Tapioca Starch/Flour
1/2 cup (65 g) (2.3 ounces) Sorghum Flour
1 cup (200 g) (7.1 ounces) Dark Brown Sugar, Lightly packed
1 teaspoon (5 mL) Baking soda
3/4 teaspoon (4 mL ) Kosher Salt
7 tablespoons (100 g) (3 ½ ounces) Unsalted Butter (Cut into 1-inch cubes and frozen)
1/3 cup (80 mL) Honey, Mild-flavoured such as clover.
5 tablespoons (75 mL) Whole Milk
2 tablespoons (30 mL) Pure Vanilla Extract

Directions:
1. In the bowl of a food processor fitted with a steel blade, combine the flours, brown sugar, baking soda, and salt. Pulse on low to incorporate. Add the butter and pulse on and off, until the mixture is the consistency of a coarse meal. If making by hand, combine aforementioned dry ingredients with a whisk, then cut in butter until you have a coarse meal. No chunks of butter should be visible.
2. In a small bowl or liquid measuring cup, whisk together the honey, milk and vanilla. Add to the flour mixture until the dough barely comes together. It will be very soft and sticky.
3. Turn the dough onto a surface well-floured with sweet rice flour and pat the dough into a rectangle about 1 inch thick. Wrap in plastic and chill until firm, about 2 hours, or overnight.
4. Divide the dough in half and return one half to the refrigerator. Sift an even layer of sweet rice flour onto the work surface and roll the dough into a long rectangle, about 1/8 inch thick. The dough will be quite sticky, so flour as necessary. Cut into 4 by 4 inch squares. Gather the scraps together and set aside. Place wafers on one or two parchment-lined baking sheets. Chill until firm, about 30 to 45 minutes. Repeat with the second batch of dough.
5. Adjust the rack to the upper and lower positions and preheat oven to 350 degrees Fahrenheit (180 degrees Celsius).
6. Gather the scraps together into a ball, chill until firm, and reroll. Dust the surface with more sweet rice flour and roll out the dough to get a couple more wafers.
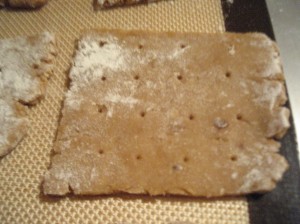
7. Prick the wafers with toothpick or fork, not all the way through, in two or more rows.
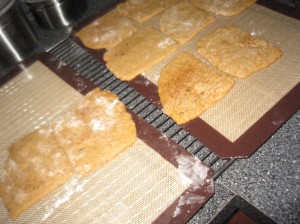
8. Bake for 25 minutes, until browned and slightly firm to the touch, rotating sheets halfway through to ensure even baking. Might take less, and the starting location of each sheet may determine its required time. The ones that started on the bottom browned faster.
9. When cooled completely, place enough wafers in food processor to make 1 ¼ cups (300 mL) of crumbs. Another way to do this is to place in a large ziplock bag, force all air out and smash with a rolling pin until wafers are crumbs.

Nanaimo Bars
Ingredients:

For Nanaimo Bars — Bottom Layer
1/2 cup (115 g) (4 ounces) Unsalted Butter
1/4 cup (50 g) (1.8 ounces) Granulated Sugar
5 tablespoons (75 mL) Unsweetened Cocoa
1 Large Egg, Beaten
1 1/4 cups (300 mL) (160 g) (5.6 ounces) Gluten Free Graham Wafer Crumbs (See previous recipe)
1/2 cup (55 g) (1.9 ounces) Almonds (Any type, Finely chopped)
1 cup (130 g) (4.5 ounces) Coconut (Shredded, sweetened or unsweetened)

For Nanaimo Bars — Middle Layer
1/2 cup (115 g) (4 ounces) Unsalted Butter
2 tablespoons and 2 teaspoons (40 mL) Heavy Cream
2 tablespoons (30 mL) Vanilla Custard Powder (Such as Bird’s. Vanilla pudding mix may be substituted.)
2 cups (254 g) (8.9 ounces) Icing Sugar

For Nanaimo Bars — Top Layer
4 ounces (115 g) Semi-sweet chocolate
2 tablespoons (28 g) (1 ounce) Unsalted Butter

Directions:
1. For bottom Layer: Melt unsalted butter, sugar and cocoa in top of a double boiler. Add egg and stir to cook and thicken. Remove from heat. Stir in crumbs, nuts and coconut. Press firmly into an ungreased 8 by 8 inch pan.
2. For Middle Layer: Cream butter, cream, custard powder, and icing sugar together well. Beat until light in colour. Spread over bottom layer.
3. For Top Layer: Melt chocolate and unsalted butter over low heat. Cool. Once cool, pour over middle layer and chill.

——————————-
Additional Information:

These bars freeze very well, so don’t be afraid to pop some into the freezer.

The graham wafers may be kept in an airtight container for up to 2 weeks. Mine lasted about that long.

If making the graham crackers with wheat, replace the gluten-free flours (tapioca starch, sweet rice flour, and sorghum flour) with 2 ½ cups plus 2 tbsp of all-purpose wheat flour, or wheat pastry flour. Watch the wheat-based graham wafers very closely in the oven, as they bake faster than the gluten-free ones, sometimes only 12 minutes.

For the Nanaimo Bars, if making with wheat, replace the gluten-free graham wafer crumbs with equal parts wheat graham wafer crumbs!

h1

November Daring Bakers’ Challenge – Cannoli

December 3, 2009

The November 2009 Daring Bakers Challenge was chosen and hosted by Lisa Michele of Parsley, Sage, Desserts and Line Drives. She chose the Italian Pastry, Cannolo (Cannoli is plural), using the cookbooks Lidia’s Italian-American Kitchen by Lidia Matticchio Bastianich and The Sopranos Family Cookbook by Allen Rucker; recipes by Michelle Scicolone, as ingredient/direction guides. She added her own modifications/changes, so the recipe is not 100% verbatim from either book.

Now, I have to prefice this post with the fact that I LOVE cannoli. There is a restaurant here in town, Rocky’s Italian Grill, that I go to for dinner just so I can get their cannoli. It’s sad really. I’ve never met a cannoli I didn’t like. Which probably explains my waistline… moving on!

My favorite cannoli I’ve ever eaten had a little bit of cinnamon in the dough with chocolate and slivered pistachios in the filling. That is what it was my goal to recreate with this challenge. I also did some that were pecan and chocolate. Tasty, but I prefer the pistachios.

Now I faught my husband for years about getting a deep fryer. Mostly because I knew if we had one we’d use it. Reference the previously mentioned waistline… However, after his grandma passed a way last year, he came home with one when his family was cleaning out her house to put it on the market. Turns out we’ve never used it until this challenge, so “Yay!” for not having to buy new equipment.

I’m a sucker for cake shows, so I always watch Ace of Cakes, the Cake Boss, and all the challenges on the Food Network. On one episode of the Cake Boss he made cannoli and I paid attention to how he rolled out and fried his cannoli, he used wood over the metal ones you can find in stores. I think this really helped my cannoli retain their shape in the oil and also helped me not to mangle the shaping 🙂


These were super tasty! We couldn’t find Marsala wine so we used Merlot instead and once I got the hang of the pasta roller it was smooth sailing as far as creating the shells. I highly recommend trying this! You definitely want to fill these on a “we’re going to eat them now” basis, however, as the shells quickly get soggy after filling!

I did have a few cannoli that found the forms too confining and wanted to break free…

This one puffed up.

We thought it made a fine mushroom for Mario!

Here’s the original recipe!

Lidisano’s Cannoli
Makes 22-24 4-inch cannoli
Prep time:
Dough – 2 hours and 10-20 minutes, including resting time, and depending on whether you do it by hand or machine.
Filling – 5-10 minutes plus chilling time (about 2 hours or more)
Frying – 1-2 minutes per cannoli
Assemble – 20–30 minutes

RECIPE NOTE: THE EQUIVALENTS FROM THIS RECIPE WERE PREPARED USING THIS CONVERSION SITE: http://www.gourmetsleuth.com/index.asp.

CANNOLI SHELLS
2 cups (250 grams/16 ounces) all-purpose flour
2 tablespoons(28 grams/1 ounce) sugar
1 teaspoon (5 grams/0.06 ounces) unsweetened baking cocoa powder
1/2 teaspoon (1.15 grams/0.04 ounces) ground cinnamon
1/2 teaspoon (approx. 3 grams/0.11 ounces) salt
3 tablespoons (42 grams/1.5 ounces) vegetable or olive oil
1 teaspoon (5 grams/0.18 ounces) white wine vinegar
Approximately 1/2 cup (approx. 59 grams/approx. 4 fluid ounces/approx. 125 ml) sweet Marsala or any white or red wine you have on hand
1 large egg, separated (you will need the egg white but not the yolk)
Vegetable or any neutral oil for frying – about 2 quarts (8 cups/approx. 2 litres)
1/2 cup (approx. 62 grams/2 ounces) toasted, chopped pistachio nuts, mini chocolate chips/grated chocolate and/or candied or plain zests, fruits etc.. for garnish
Confectioners’ sugar

Note – If you want a chocolate cannoli dough, substitute a few tablespoons of the flour (about 25%) with a few tablespoons of dark, unsweetened cocoa powder (Dutch process) and a little more wine until you have a workable dough (Thanks to Audax).

CANNOLI FILLING
2 lbs (approx. 3.5 cups/approx. 1 kg/32 ounces) ricotta cheese, drained
1 2/3 cups cup (160 grams/6 ounces) confectioner’s sugar, (more or less, depending on how sweet you want it), sifted
1/2 teaspoon (1.15 grams/0.04 ounces) ground cinnamon
1 teaspoon (4 grams/0.15 ounces) pure vanilla extract or the beans from one vanilla bean
3 tablespoons (approx. 28 grams/approx. 1 ounce) finely chopped good quality chocolate of your choice
2 tablespoons (12 grams/0.42 ounces) of finely chopped, candied orange peel, or the grated zest of one small to medium orange
3 tablespoons (23 grams/0.81 ounce) toasted, finely chopped pistachios

Note – If you want chocolate ricotta filling, add a few tablespoons of dark, unsweetened cocoa powder to the above recipe, and thin it out with a few drops of warm water if too thick to pipe.

DIRECTIONS FOR SHELLS:
1. In the bowl of an electric stand mixer or food processor, combine the flour, sugar, cocoa, cinnamon, and salt. Stir in the oil, vinegar, and enough of the wine to make a soft dough. Turn the dough out onto a lightly floured surface and knead until smooth and well blended, about 2 minutes. Shape the dough into a ball. Cover with plastic wrap and let rest in the fridge from 2 hours to overnight.

2 Cut the dough into two pieces. Keep the remaining dough covered while you work. Lightly flour a large cutting or pastry board and roll the dough until super thin, about 1/16 to 1/8” thick (An area of about 13 inches by 18 inches should give you that). Cut out 3 to 5-inch circles (3-inch – small/medium; 4-inch – medium/large; 5-inch;- large. Your choice). Roll the cut out circle into an oval, rolling it larger and thinner if it’s shrunk a little.

3 Oil the outside of the cannoli tubes (You only have to do this once, as the oil from the deep fry will keep them well, uhh, oiled..lol). Roll a dough oval from the long side (If square, position like a diamond, and place tube/form on the corner closest to you, then roll) around each tube/form and dab a little egg white on the dough where the edges overlap. (Avoid getting egg white on the tube, or the pastry will stick to it.) Press well to seal. Set aside to let the egg white seal dry a little.

4. In a deep heavy saucepan, pour enough oil to reach a depth of 3 inches, or if using an electric deep-fryer, follow the manufacturer’s directions. Heat the oil to 375°F (190 °C) on a deep fry thermometer, or until a small piece of the dough or bread cube placed in the oil sizzles and browns in 1 minute. Have ready a tray or sheet pan lined with paper towels or paper bags.

5. Carefully lower a few of the cannoli tubes into the hot oil. Do not crowd the pan. Fry the shells until golden, about 2 minutes, turning them so that they brown evenly.

8. Lift a cannoli tube with a wire skimmer or large slotted spoon, out of the oil. Using tongs, grasp the cannoli tube at one end. Very carefully remove the cannoli tube with the open sides straight up and down so that the oil flows back into the pan. Place the tube on paper towels or bags to drain. Repeat with the remaining tubes. While they are still hot, grasp the tubes with a potholder and pull the cannoli shells off the tubes with a pair of tongs, or with your hand protected by an oven mitt or towel. Let the shells cool completely on the paper towels. Place shells on cooling rack until ready to fill.

9. Repeat making and frying the shells with the remaining dough. If you are reusing the cannoli tubes, let them cool before wrapping them in the dough.

Pasta Machine method:
1. Divide the dough into 4 equal pieces. Starting at the middle setting, run one of the pieces of dough through the rollers of a pasta machine. Lightly dust the dough with flour as needed to keep it from sticking. Pass the dough through the machine repeatedly, until you reach the highest or second highest setting. The dough should be about 4 inches wide and thin enough to see your hand through

2. Continue rolling out the remaining dough. If you do not have enough cannoli tubes for all of the dough, lay the pieces of dough on sheets of plastic wrap and keep them covered until you are ready to use them.

3, Roll, cut out and fry the cannoli shells as according to the directions above.

For stacked cannoli:
1. Heat 2-inches of oil in a saucepan or deep sauté pan, to 350-375°F (176 – 190 °C).

2. Cut out desired shapes with cutters or a sharp knife. Deep fry until golden brown and blistered on each side, about 1 – 2 minutes. Remove from oil with wire skimmer or large slotted spoon, then place on paper towels or bags until dry and grease free. If they balloon up in the hot oil, dock them lightly prior to frying. Place on cooling rack until ready to stack with filling.

DIRECTIONS FOR FILLING:
1. Line a strainer with cheesecloth. Place the ricotta in the strainer over a bowl, and cover with plastic wrap and a towel. Weight it down with a heavy can, and let the ricotta drain in the refrigerator for several hours to overnight.

2. In a bowl with electric mixer, beat ricotta until smooth and creamy. Beat in confectioner’s sugar, cinnamon, vanilla and blend until smooth. Transfer to another bowl and stir in chocolate, zest and nuts. Chill until firm.(The filling can be made up to 24 hours prior to filling the shells. Just cover and keep refrigerated).

ASSEMBLE THE CANNOLI:
1. When ready to serve..fill a pastry bag fitted with a 1/2-inch plain or star tip, or a ziplock bag, with the ricotta cream. If using a ziplock bag, cut about 1/2 inch off one corner. Insert the tip in the cannoli shell and squeeze gently until the shell is half filled. Turn the shell and fill the other side. You can also use a teaspoon to do this, although it’s messier and will take longer.

2. Press or dip cannoli in chopped pistachios, grated chocolate/mini chocolate chips, candied fruit or zest into the cream at each end. Dust with confectioner’s sugar and/or drizzles of melted chocolate if desired.

PUMPKIN FILLING
1/2 cup (123 grams/4.34 ounces) ricotta cheese, drained
1/2 cup (113 grams/4.04 ounces) mascarpone cheese
1/2 cup (122.5 grams/4.32 ounces) canned pumpkin, drained like ricotta
3/4 cup (75 grams/2.65 ounces) confectioner’s sugar, sifted
1/2 to 1 teaspoon (approx. 1.7 grams/approx. 0.06 ounces) pumpkin pie spice (taste)
1/2 teaspoon (approx. 2 grams/approx. 0.08 ounces) pure vanilla extract
6-8 cannoli shells

1. In a bowl with electric mixer, beat ricotta and mascarpone until smooth and creamy. Beat in confectioner’s sugar, pumpkin, pumpkin pie spice, vanilla and blend until smooth. Transfer to another bowl, cover and chill until it firms up a bit. (The filling can be made up to 24 hours prior to filling the shells. Just cover and keep refrigerated).

2. Fill the shells as directed above. I dipped the ends of the shells in caramelized sugar and rolled them in toasted, chopped pecans.
h1

Macarons – October 2009 Daring Baker’s Challenge

October 27, 2009

The 2009 October Daring Bakers’ challenge was brought to us by Ami S. She chose macarons from Claudia Fleming’s The Last Course: The Desserts of Gramercy Tavern as the challenge recipe.

The recipe for this challenge calls for almond flour. Now I’m not a huge fan of almond flavor in anything but an actual almond so I was ecstatic to read that we could substitute any other nut we wanted! I immediately searched the internet for hazelnut flour and pecan flour. My two favorite nut baking flavors. While I found both I ultimately decided to go with pecan flour/meal that I found here.

I grew up eating fantastic pecan pie. My grandfather was from Alabama and he told stories about getting sent to the neighbor’s house, with a brown paper bag, to collect pecans then having to shell them for his momma’s pecan pie. He always used her recipe and no pecan pie has ever come close to the ones he used to make. Believe me, we’ve all tried.

Since no one can get it as good, I started making chocolate pecan pies. Very tasty and still sparks the memories without the ultimate disappointment of a lesser pie. And since chocolate pecan pie is my very favorite kind of pie now and when I think of fall I think of that pie I decided to do a chocolate pecan pie macaroon. Yum!

To make these I substituted pecan flour for the almond flour in the recipe below.

macaron half

Then I put a layer of dark chocolate on the bottom of each cookie. Everything’s better with dark chocolate, in my opinion!

chocolate

Last I made this recipe for pecan pie filling, added about a 1/2 a cup of chopped pecans and sandwiched it between two macaroons.

filling shot

Presto!

macaron close up

Chocolate Pecan Pie Macaroon! Yummo!

You gotta try one!

Original challenge recipe below!

Ingredients
2 1/4 cups Confectioners’ sugar
2 cups almond flour
2 tablespoons granulated sugar
5 egg whites, at room temperature

Directions:

1. Preheat the oven to 200°F. Combine the confectioners’ sugar and almond flour in a medium bowl. If grinding your own nuts, combine nuts and a cup of confectioners’ sugar in the bowl of a food processor and grind until nuts are very fine and powdery.
2. Beat the egg whites in the clean dry bowl of a stand mixer until they hold soft peaks. Slowly add the granulated sugar and beat until the mixture holds stiff peaks.
3. Sift a third of the almond flour mixture into the meringue and fold gently to combine. If you are planning on adding zest or other flavorings to the batter, now is the time. Sift in the remaining almond flour in two batches. Be gentle! Don’t overfold, but fully incorporate your ingredients.
4. Spoon the mixture into a pastry bag fitted with a plain half-inch tip (Ateco #806). You can also use a Ziploc bag with a corner cut off. It’s easiest to fill your bag if you stand it up in a tall glass and fold the top down before spooning in the batter.
5. Pipe one-inch-sized mounds of batter onto baking sheets lined with nonstick liners (or parchment paper).
6. Bake the macaroon for 5 minutes. Remove the pan from the oven and raise the temperature to 375°F. Once the oven is up to temperature, put the pans back in the oven and bake for an additional 7 to 8 minutes, or lightly colored.
7. Cool on a rack before filling.

Yield: 10 dozen.

h1

Peanut Butter and Jelly Cake

October 17, 2009

pre-iced close up

I love this cake! It is one of my all time favorites. I make it whenever I get the chance.

This particular creation was made for my friend Leslie. She and her hubby were celebrating their 3rd wedding anniversary and this was one of the layers I made for their wedding cake.

The icing is FANTASTIC! It could be a dessert all on it’s own… I highly recommend it for any number of cakes. Anywhere you’d use caramel frosting this one will work too. And on a chocoate cake? Delish.

Now, I’m a pb & j purist. I always use Jif peanut butter and Welch’s grape jelly. Of course you can use any peanut butter you want and any jelly. It just won’t be as good 😉

finished cake

Peanut Butter and Jelly Cake

2 c. unsifted all purpose flour
1 tbsp. baking powder
1 tsp. salt
1/2 c. butter, softened (1 stick)
1/4 c. creamy peanut butter
1 1/3 c. sugar
2 eggs
1 c. milk
1 tsp. vanilla
3/4 c. grape jelly

Preheat oven to 350 degrees. Grease and flour two 9 x 1 1/2 inch round layer cake pans; or use Pam. Sift together baking powder, flour, and salt. Beat together butter and peanut butter until well blended; add sugar and beat until fluffy. Beat in eggs, one at a time. Mix in flour mixture, alternately with milk, beginning and ending with flour. Add vanilla. Pour into prepared pan. Bake at 350 degrees for 30-35 minutes.

Spread jelly between layer and frost with Peanut Butter Frosting.

Peanut Butter Frosting

1/2 cup butter, softened

1 cup creamy peanut butter

3 tablespoons milk, or as needed

2 cups confectioners’ sugar

Place the butter and peanut butter into a medium bowl, and beat with an electric mixer. Gradually mix in the sugar, and when it starts to get thick, incorporate milk one tablespoon at a time until all of the sugar is mixed in and the frosting is thick and spreadable. Beat for at least 3 minutes for it to get good and fluffy

Garnish with peanut butter chips, if desired.

//

h1

S’mores Bars

September 6, 2009

S'mores Brownie top

I found this recipe on Peabody‘s blog the other day and thought it would be perfect to make on Saturday. You see on Saturday, some of my girlfriends and I got together for my friend Beth’s bachelorette. She wasn’t really interested in going out and wooping it up, so we had a Baking Bachelorette. Everyone came over, brought their pj’s, their favorite alcohol, and a recipe with fixings to bake. Whenever I think of a sleepover I think of Girl Scout camp at Bear Creek and S’mores, so this was the perfect recipe to stumble upon.

The bars are FANTASTIC!! They are sticky and gooey and just… mmm! Scrumdidiliumptious! Thanks Peabody for hooking me up with such a winning recipe!

S'mores Brownie side

S’mores Bars

Graham Cracker Crust

2 ¼ cups graham cracker crumbs (15-17 crackers)…I used 18
1/3  cup granulated sugar
¾ cup unsalted butter, melted
Fudge Brownie Filling:

6 ounce unsweetened chocolate, chopped
1 cup plus 2 TBSP unsalted butter, chopped into TBSP sized pieces
2 ½ cups granulated sugar
5 large eggs, lightly beaten
1 ½ tsp vanilla extract
1 ¾ cups all-purpose flour

1 ½ cups pecan halves, chopped
4 cups (packed) miniature marshmallows

Line a 10 x 15x 2 inch glass baking dish with foil, leaving a 1-inch over hang around the top edge of the pan. Smooth out any big wrinkles in the foils and then lightly coat the foil with nonstick cooking spray.

Preheat oven to 350F.

Combine the graham cracker crumbs and sugar in a small bowl. Gradually add the melted butter until the crumbs just hold together when squeezed in your palm. Press the mixture into an even ¼ inch layer on the bottom of th prepared pan. Run a smooth bottomed measuring cup over the crust to pack and level it.

Combine the chocolate and butter in a large bowl that fists a double boiler. Place the bowl over barely simmering water and stir as needed until the chocolate and butter are melted. Remove from the heat and whisk in the sugar, followed by the beaten eggs and vanilla extract. Stir in the flour, mixing until smooth. Pour the batter on top of the graham cracker crust and level with a small offset spatula.

Scatter chopped nuts evenly over the batter. Bake 30-35 minutes, or until cake tester inserted in brownie center comes out with dark, damp crumbs on it. Do not overbake. Set on a wire rack and cool completely in the pan.

Distribute the marshmallows evenly over the brownie top. Place the pan under the broiler in the top third of the oven for about 1 minute, or until he marshmallows are puffy and golden brown. Watch carefully and rotate the pan regularly, as the marshmallow can easily burn. Cool until the topping is firm and easily cut without sticking.

Remove the brownies from the pan in one block by gently pulling up on the foil overhang. Place directly on a cutting board. Remove all foil and cut into 2-inch squares. For the neatest cuts, use a sharp knife, wiped clean with a warm, damp cloth between slices.

Adapted from Cookie Swap by Julie M. Usher